


An overview
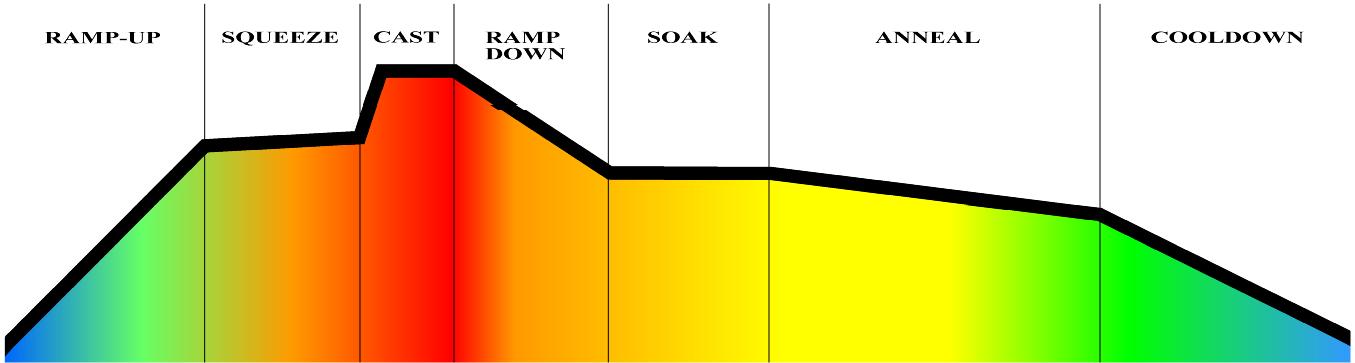
A typical firing profile is pictured above. If you've done much kilnwork you've seen it before.
Let's go over the steps:
- Ramp-up brings your glass up above the strain point to a working temperature. This can be rapid if you're using frits, cullets or scrap glass. If you're using thick pieces (like billet) or re-firng an existing casting, ramp up more slowly to avoid breakage due to thermal shock.
- The squeeze gives the glass time to settle into the mold, and allows bubbles to escape so they aren't trapped in your casting. Go fast here (or even eliminate this step) if you're trying to trap bubbles, but slow down if you are looking for a more bubble-free casting.
- During casting, the glass becomes fluid enough to flow into the mold. Allow enough time during this stage for the glass to completely flow into place. But beware: too much time can cause color shifts in some glasses; if these are cooked too long, they can fall out of compatibility with other colors.
- Ramp-down brings the temperature of your casting down to just above the strain point to prepare it for annealing. You should move through this stage at the rate that best suits your casting: thinner, more evenly shaped pieces will be able to cool more quickly than thicker or more irregularly-shaped pieces. It's important to remember that you want your glass to cool evenly through this step, and not try to push your kiln faster than the glass can reasonably cool.
Once you've ramped the temperature back down near the strain point, it's time to prepare for annealing. A good basic understanding of the annealing process is important if you want to produce successful castings, so let's take a moment to examine it.
Annealing creates stress-free glass. Stress is pressure caused by force exerted on the glass; this force can be external (pushing, pulling, bending) or internal (temperature or physical expansion differentials.) If the pressure is too strong, the glass breaks (we call this mechanical or thermal shock.) In the kiln, we are mostly interested in stress caused by temperature differentials. These happen because it takes glass time to heat up (or cool down) and until that heat has soaked through to the middle of your casting there will be a difference in temperature between the surface and the middle. The thicker the glass, the greater the difference. How rapidly you change your kiln temperature affects this, too: the steeper the ramp, the greater the difference.
How glass reacts to stress depends on its temperature. One of the unique aspects of glass is that it has two separate temperature ranges, each having its own set of physical characteristics. In the lower range are the everyday glass characteristics we all know:
- Hard (not easily cut or scratched)
- Rigid (not easily flexed or stretched)
- Brittle (breaks rather than deforming)
- Cohesive (doesn't stick to other stuff)
- Physical characteristics don't discernably change with temperature
- Soft (easily cut, dented , scratched)
- Flexible (easily bent or stretched)
- Malleable (easily shaped)
- Adhesive (sticks to other stuff)
- Physical characteristics vary with temperature (hotter = softer, more flexible, malleable, sticky)
In the upper temperature range, glass acts more like a viscous liquid.
We use these characteristics in the kiln: heat the glass until it becomes soft enough to slump into a mold or form; even hotter, it sticks to other pieces of glass. Hotter still and it flows to remove voids and fill a mold, or continues flowing until it reaches a thickness of about 1/4 inch (or flows off the edge of your shelf...)
The temperature that divides the two ranges is called the strain point. Below the strain point, the glass is too stiff to move on its own, and too great a temperature difference will cause it to break. Above, it can move to relieve stress (this is called strain, hence the name.) Glass that's up at casting temperature is very fluid, and easily moves to relieve stress caused by thermal differences. Down nearer the strain point, it's a different story; at this temperature the glass is very sluggish. It can only move slowly, and needs significant amounts of time to relieve stress.
If glass is cooled below the strain point before stress resulting from a thermal gradient can be relieved, the stress becomes permanent. A small amount of permanent stress isn't a problem (in fact, it makes the glass stronger) but too much leaves the glass in an unstable state that can spontaneously relieve later by breaking (an annealing failure.) Even worse, extreme stress can relieve explosively, throwing razor-sharp chunks and shards with great force into the space around it. Ouch!
An effective anneal avoids these potential problems by evening out the temperature of your glass just above the strain point, then slowly moving it past the point where it becomes rigid. We do this in two steps: the soak and the annealing ramp.
- The Soak is just that: a period of time soaking at a constant temperature to minimize the differential between the surface and the center of your casting. The thicker your piece is, the longer it needs to spend in the soak. Also, think back to your ramp-down rate - moving a thick casting quickly through that stage just means spending more time here. Never forget that you can always cool the kiln down faster than the piece inside it.
- The annealing ramp is a long, slow ramp starting at the soak temperature and ending at a point safely below the strain point. Again, the thicker your piece, the slower this ramp needs to be. Look to your glass manufacturer's website for examples to guide you in selecting this rate, and don't forget to include the mold or containment holding your glass in determining cooldown rates. This isn't a big deal when using ShapeCasters, but can be significant with plaster or other thick molds
- Cool-down can commence once your entire casting is safely below the strain point. The purpose of this step is to get your glass down to room temperature. As above, thicker pieces need to move more slowly than thinner ones. It's also good practice to leave the piece in the kiln until it's completely cool to the touch, and to avoid any coldworking for a day afterward.
Finally, always remember: every kiln is different, and every casting is unique. Learn how your equipment works, keep a kiln log and take good notes about each casting you make. Firing schedules given to you by others or recommended by manufacturers are just a starting point and should be adjusted to compensate for your kiln's variations.
When in doubt, slow down, make test samples and practice pieces. Experience is always the best teacher.